
+86-15339975475
info@archeanref.com
info@archeanref.com
+8615339975475
Wutongli, linyi, Shandong, China


Views: 0 Author: Site Editor Publish Time: 2026-03-16 Origin: Site


Scroll compressors are widely recognized for their high efficiency, reliability, and quiet operation. However, when abnormal noises occur during operation, it often signals underlying issues that require immediate attention. Ignoring these sounds can lead to complete system failure, costly repairs, and extended downtime.
This comprehensive guide provides a step-by-step diagnostic workflow for identifying and resolving noise issues in scroll compressors. Whether you are a service technician, facility manager, or HVAC/R system designer, this logical approach will help you quickly pinpoint the root cause and implement effective solutions.
Scroll compressor noise typically originates from three main areas:
Lubrication System Issues – Problems with oil quantity or quality
Refrigerant System Imbalances – Improper refrigerant charge or flow
Mechanical Component Failure – Worn or broken internal parts
By following a systematic diagnostic process, you can determine which of these areas is causing the problem and take corrective action.
Step 1: Assess the Vibration Level
The first step in diagnosing noise is to observe the compressor's vibration characteristics. This initial observation branches the diagnostic path into two main directions.
Branch A: Compressor Vibration is Not Significant
If the compressor is running with minimal vibration but producing abnormal noise, the next step is to inspect the oil level and condition through the sight glass.
Scenario 1: Oil Visible (Low Oil Level or Black Oil)
Root Cause Analysis:
High Discharge Temperature: Prolonged operation at high temperatures causes the lubricating oil to oxidize and carbonize.
Oil Carbonization: Carbonized oil loses its lubricating properties and can block oil passages, leading to increased friction and noise.
Corrective Actions:
Replace the Oil: Drain the contaminated oil and refill with the manufacturer-recommended type and quantity.
Replace the Filter: Install a new oil filter to remove carbon deposits and contaminants from the lubrication circuit.
Post-Repair Verification:
If Noise is Reduced: Check the suction and discharge pressures. Adjust the refrigerant charge or expansion valve settings to bring pressures back to the normal operating range. The system should now operate quietly.
If Noise Persists: The issue may be mechanical. Inspect the Oldham coupling (cross ring) and scroll sets for wear or damage. These components can cause noise even when lubrication appears adequate.
Scenario 2: Oil Not Visible (Compressor Oil Starvation)
Root Cause Analysis:
Insufficient Oil Return: Long refrigerant piping runs or improper pipe sizing can prevent oil from returning to the compressor crankcase.
Oil Trapping: Poor piping design can create traps where oil accumulates.
Oil Carbonization: As mentioned above, degraded oil can also lead to low effective oil levels.
Corrective Actions:
Add Oil: Immediately add the correct type and amount of oil to bring the sight glass to a proper level.
Post-Repair Verification:
If Noise is Reduced: Continue monitoring the system during operation. Check for consistent oil return by observing the sight glass under load. If oil return is a chronic issue, consider modifications to the refrigerant piping.
If Noise Persists: Again, proceed to inspect the Oldham coupling and scroll mechanism for damage resulting from the period of oil starvation.
Step 2: When Vibration is Significant
If the compressor is shaking or vibrating intensely, this indicates a more severe problem. The next observation point is the presence of frost or heavy condensation on the compressor shell.
Branch B: Compressor Vibrates Intensely
Scenario 1: Frost or Heavy Condensation Present on Shell
Root Cause Analysis:
Liquid Slugging (Floodback): This is a critical condition where liquid refrigerant enters the compressor. Because liquids are incompressible, the compressor attempts to compress liquid, resulting in loud knocking noises and severe mechanical stress.
Common Causes of Slugging:
Excessive Refrigerant Charge: Too much refrigerant in the system.
Oversized or Malfunctioning Expansion Valve: An expansion valve that is stuck open or too large allows too much liquid to pass through.
Evaporator Fan Failure: Poor airflow over the evaporator coil prevents proper heat exchange, causing un-evaporated liquid to return to the compressor.
Corrective Actions:
Remove Refrigerant: Carefully recover excess refrigerant to bring the charge to the specified level.
Adjust or Replace Expansion Valve: Reset the superheat setting or replace the valve with a correctly sized one.
Repair Evaporator Fans: Ensure all evaporator fans are operating correctly to promote proper heat exchange and complete refrigerant evaporation.
Scenario 2: No Frost or Condensation on Shell
Root Cause Analysis:
Mechanical Fracture: Intense vibration without the presence of frost strongly suggests a catastrophic mechanical failure inside the compressor.
Specific Failures: This is almost always due to a broken scroll set (fixed or orbiting scroll) or a fractured Oldham coupling (cross ring). These components are critical for the compression process, and their failure leads to violent, unbalanced operation.
Corrective Actions:
Replace Damaged Components: This typically requires removing the compressor from the system, disassembling the pump, and replacing the broken scrolls or Oldham coupling. In many field service scenarios, replacing the entire compressor is the most practical and reliable solution to ensure a proper repair.
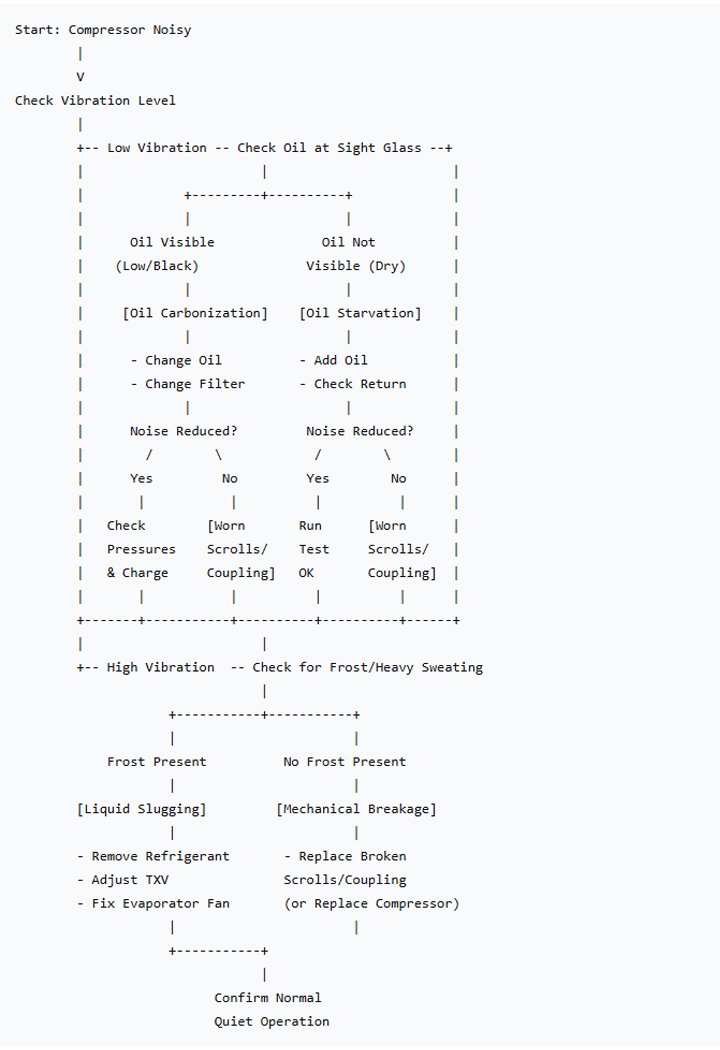
Summary: Diagnostic Logic Flow
The entire diagnostic process can be summarized in this logical flowchart:
Troubleshooting Checklist for Quick Reference:
Symptom Primary Check Likely Cause Solution
Low Vibration + Noise Oil Sight Glass Low Oil / Carbonized Oil Change oil & filter
No Oil Visible Add oil, check oil return
(If oil OK) Check Oldham ring / scrolls
High Vibration Compressor Shell Frost / Sweating present Liquid slugging Remove refrigerant, adjust TXV
Dry Shell Broken scrolls / coupling Replace mechanical parts
Conclusion
Systematic diagnosis is the key to efficiently resolving scroll compressor noise issues. By following this logical progression—starting with vibration, then checking oil, and finally observing the compressor shell—technicians can quickly differentiate between lubrication problems, refrigerant system imbalances, and mechanical failures. This structured approach minimizes downtime, reduces the risk of misdiagnosis, and ensures the long-term reliability of the refrigeration or air conditioning system.
Scroll compressor noise issues are not insurmountable. By mastering a systematic diagnostic approach and using high-quality service parts, most problems can be effectively resolved. We hope this article provides practical value for your work. If you need any compressors or components mentioned above for your repairs, we invite you to visit our store ( Reciprocating compressor ), where we are dedicated to supporting your success with precision and efficiency in every service task.


